Table of Contents
/!\ Tutorials apply to generator version 0.5 to 0.69 only
First launch - Importation of RPG Maker Default Resources
Use of the main window : creating a character
Saving characters and sets
Random characters
Database - Categories and parts
Database - Templates
Database - Gradient colors
Database - Mask colors
Adding/removing/editing resources
Import/exporting new resources with RXGE2 files
Importation/Exportation of database - RXGD2 files
Introduction
The Extended Generator was created to bring new possibilities to RPG Maker MV and MZ users. While the default generator already offers many options, it still lacks several important features. This tool keeps all the original functionality while adding new conveniences and greater flexibility. Because of these additions, however, the Extended Generator is more complex than the built-in MV/MZ generators. These guides will help you understand how everything works.
First launch — Importation of RPG Maker resources
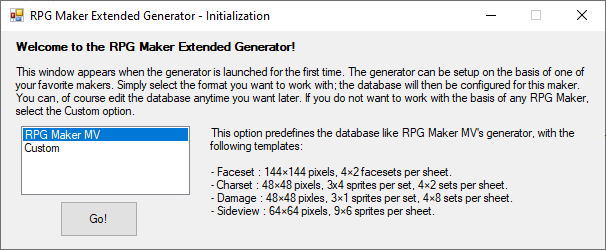
When you launch the generator for the first time, you must choose a database mode. Selecting Custom gives you an empty generator that you configure completely yourself. The other options automatically preconfigure the database to match the corresponding RPG Maker version.
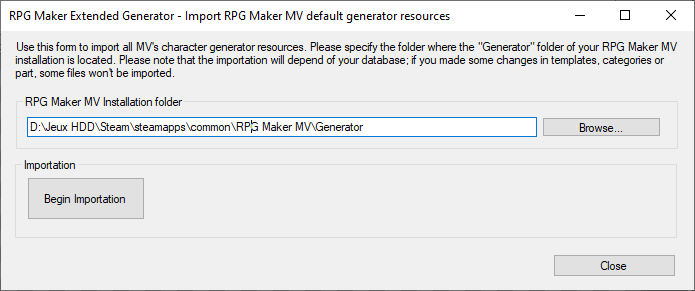
If you choose the RPG Maker MV configuration, a new window opens to let you import all default resources from your RPG Maker MV installation. You can reopen this window later via the menu Resources → Import RPG Maker MV resources.
Enter or browse to the Generator folder inside your RPG Maker MV installation directory. If MV is installed correctly, the path is usually detected automatically. Once the correct folder is selected, click Begin importation. After the process finishes, click Close (the window also closes automatically after a few seconds).
After this step, all default RPG Maker MV resources are available in the generator. Important: If you later re-import the default MV resources, any custom resources that use the same filenames as the originals will be overwritten.
Creating a character
The main window is divided into several sections. Here's a breakdown of each area:
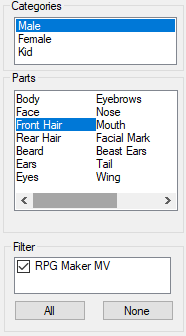
On the left you find the filters: Categories (Male, Female, Kid, etc.) and Parts (Face, Hair, Clothes, etc.). The bottom section lets you show only elements matching custom tags you can create in the database. By default, all imported resources are tagged with RPG Maker MV or RPG Maker MZ.
Unlike the official generator, parts are not strictly locked to categories — you can freely mix Male and Female elements on the same character.

The top section displays available resources based on your current filters. To add an element, click the Add button or simply double-click the item. Unlike the default MV generator, you can stack multiple elements of the same part type. To replace an existing element, use the Replace button or right-click the new item.
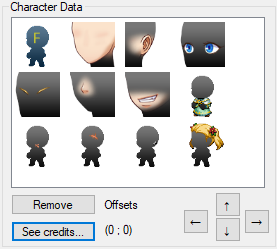
The top-right panel shows all elements currently added to your character. To replace an element, make sure the same part is selected in the filters. To remove one, click Remove or right-click it. The See credits button shows the authors of all currently used elements — very helpful for giving proper credit.
On the far right are four arrow buttons. They let you fine-tune the position (offset) of any element on every template type (face, charset, etc.). Select the element/template you want to adjust, then click (or hold) the arrows to move it.
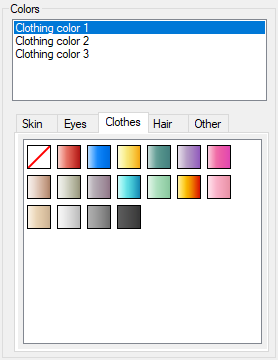
When an element is selected, its details appear at the bottom. Here you choose colors for that element. Notice that changing shared colors (skin, eyes, hair, etc.) automatically updates all matching elements at once — saving a lot of time.
Saving characters & sets
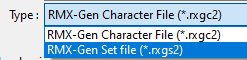
The Extended Generator saves characters in two main formats:
- RXGC2 files — for complete characters (what you will typically use in RPG Maker)
- RXGS2 files — for sets (partial character configurations, such as a pre-colored outfit, hairstyle, or face preset)
Both types are saved using the same save dialog — the only difference is the file extension you choose and how you intend to use them. Sets are especially useful because they can be quickly applied to any character without re-selecting and re-coloring each part every time.
To apply a saved set to your current character, go to File → Add character set or use the corresponding toolbar button. This adds all the parts, layers, and colors from the set in one step.
To save either a character or a set:
- Open the save dialog (via File → Save or the toolbar)
- Change the file type filter at the bottom to RXGC2 (characters) or RXGS2 (sets) as needed
You can also import characters directly from RPG Maker MV's JSON files via File → Import → RPG Maker JSON. Since MV .json files usually contain three characters (face/charset/side-view), you will be asked to select which one to import.
Note: This import works reliably only if you have not modified the default MV resource names or structure.
Exporting finished characters to image files works just like in RPG Maker MV. Use:
- File → Export
- Right-click on the preview image
- The corresponding toolbar button

In the export window:
- Select the desired template/sheet type (e.g., Faces 4×2, Charsets 4×2, etc.)
- Click an empty slot on the preview grid to place your character
To add your character to an existing sheet (e.g., one that already has other faces and still has free slots):
- Click Load an existing… and select the PNG file
- The loaded image appears in the preview
- Click a free slot to place your new character
Additional options:
- Automatic tile location — checked by default; the generator finds the next free slot and warns you if the sheet is full
- Erase behind picture — checked by default; placing a new image overwrites whatever was in that slot. Uncheck this if you want to preserve the background (rarely needed)
When ready, click Export picture… to save the updated sheet.
Random characters
You can generate a completely random character via the menu Edit → Randomize character. The randomization respects the probabilities defined for each part and category.
To customize how randomization behaves, go to Edit → Define randomization rules.
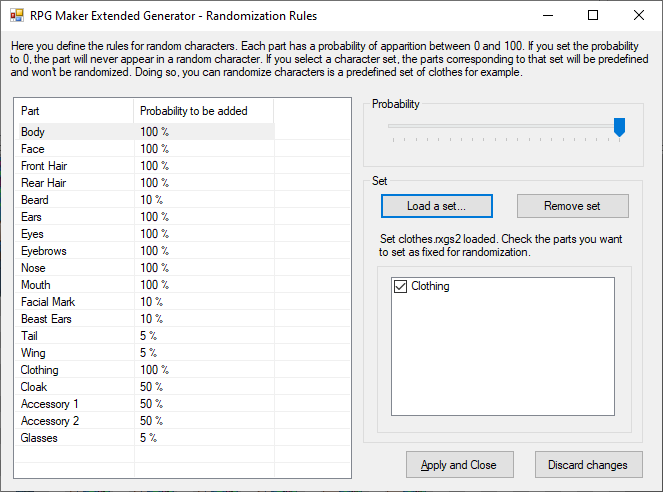
In this window you set the probability (0–100%) for each part to appear on a randomly generated character. The screenshot above shows the default settings for RPG Maker MV compatibility (e.g., wings have only a 5% chance).
Adjust each slider to change the likelihood. Setting a value to 0% removes that part entirely, while 100% guarantees it will always appear.
These rules are saved automatically when you close the window and remain in effect across sessions. The only exception is the currently loaded set: if a set is active when you randomize, the generator forces that entire set to be included every time (useful for generating many characters wearing the same outfit, for example). Be aware that any fixed colors defined in the set (skin, hair, eyes, etc.) will also override randomization for those attributes.
Categories & parts
You can add, rename, or reorganize categories beyond the defaults. Open the menu Configuration → Categories and parts….
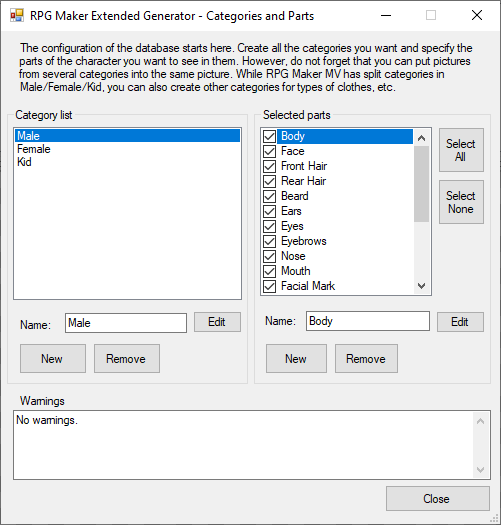
In this window you can:
- Rename existing categories
- Add new categories
- Duplicate categories
- Decide which parts are visible/available in each category (e.g. uncheck “Beards” for the Female category)
Click Done to save your changes.
Templates
If the built-in Face, Charset, Damage and SideView templates are not enough, you can create custom ones. Open the menu Configuration → Templates….
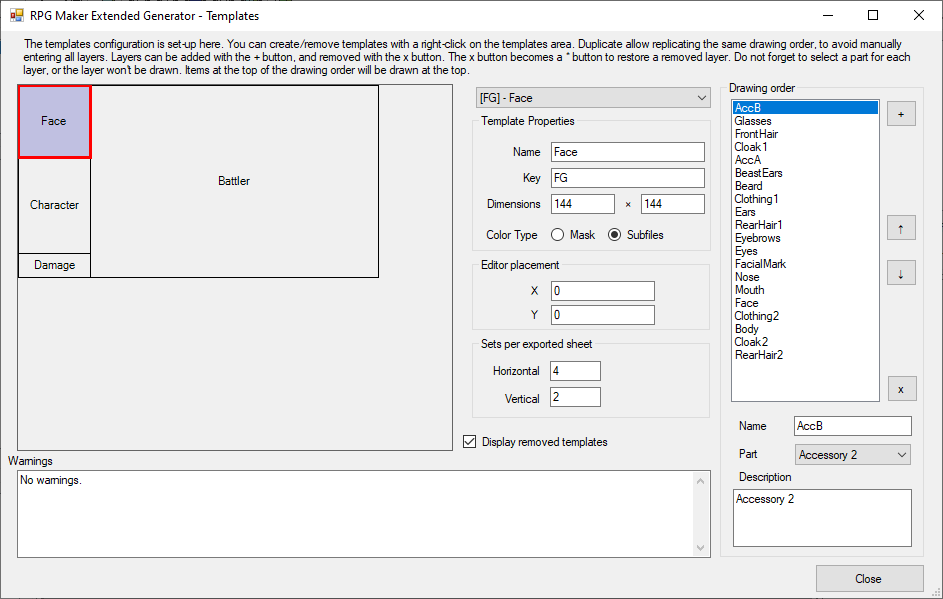
Each template is defined by:
- A unique Key (used as the folder name for resources — cannot be duplicated)
- Dimensions (width × height)
- Position in the editor preview
- Sets per exported sheet (e.g. 4×2 = 8 faces per PNG file)
- Color Type:
- Mask files — for templates that use separate mask files (charsets, side-view actors, etc.)
- Mask color ID — for templates where each element variation uses a single solid color (typical for face parts)
You also define the drawing order by creating layers and assigning each one to a specific part (from the Categories & Parts settings). The topmost layer in the list appears on top in the final image.
Right-click in the template list to create, duplicate or delete templates. The generator will warn you if your changes would cause existing resources to become incompatible or be deleted.
Gradient colors
Gradients are grouped into color categories (the tabs that appear in the main window when coloring an element). The Other category cannot be deleted or edited directly — unused gradients fall back to it. You can freely reorder the other categories.
To import an existing gradient sheet:
- Click Import gradient file…
- Select a PNG that is 256 pixels wide and has a height that is a multiple of 4
Imported gradient sheets cannot be edited directly, but you can preview their effect on any image by clicking the preview picture on the right to load a different sample.
To create a new gradient from scratch:
- Click New gradient…
- Adjust sliders to define color stops
- Double-click the gradient preview to add a new stop
- Right-click a stop to remove it
- Double-click a stop to change its color
- To reposition a stop, select it, enter a new position (0–255) and click Set
Note: stops cannot occupy the exact same position.
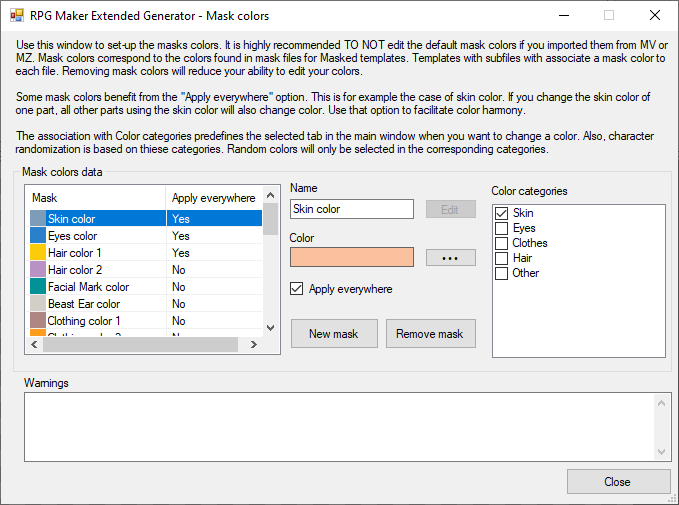
Mask colors
Coloring in the generator relies on mask colors that define which areas of an image can be tinted and how. Manage them via Configuration → Mask colors….
 p class="muted">
If you imported the default RPG Maker resources, many mask colors are already registered. Each has a descriptive name (Skin, Hair, Eyes, etc.).
p class="muted">
If you imported the default RPG Maker resources, many mask colors are already registered. Each has a descriptive name (Skin, Hair, Eyes, etc.).
To add a new mask color, click New mask.
Select any mask and click the … button to change its color value.
The Apply everywhere checkbox is very important for shared colors:
- When checked (default for Skin, Hair, Eyes), changing that color on one element automatically updates it across the entire character (body + face + side-view, etc.)
- This saves time and keeps colors consistent
Each mask color can be linked to one or more gradient categories. When coloring an element, the generator opens the appropriate color tab(s) automatically. Randomization also respects these category associations when choosing colors.
Managing resources
You can manually add, edit or remove resources at any time. Open the menu Resources → Manually edit resources….
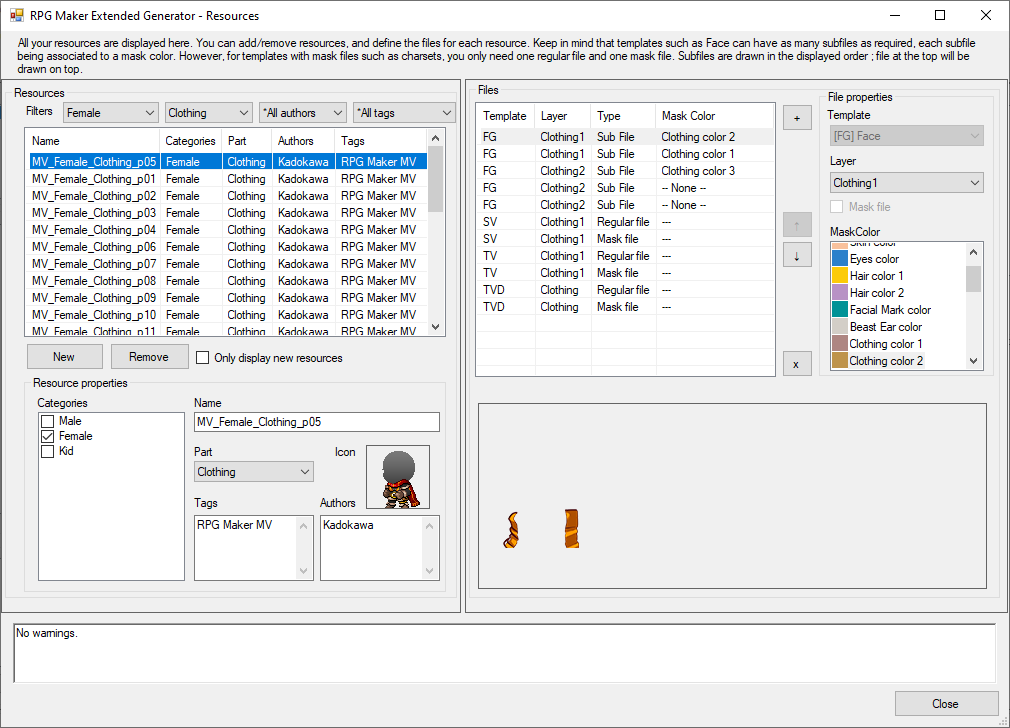
The window is divided in two main areas:
- Left side: resource properties (name, categories, part, tags, authors, icon)
- Right side: files associated with each template
Use the dropdown filters at the top left to narrow down the list. For each resource you can:
- Set a display name
- Assign categories, part, tags, and authors (tags/authors are entered one per line)
- Choose a 64×64 icon by clicking the icon area
When creating a new resource (New button), it inherits properties from the currently selected resource.
On the right, add files for each template:
- Sub File — used in templates like faces (one piece per mask color; order determines layering)
- Regular File — the base colored image (only one per template)
- Mask File — the grayscale mask that defines tintable areas (only one per template)
Click Click here to import picture or drag & drop PNG files. The image dimensions must exactly match the template (shown in the dialog title).
You can also drag multiple PNG files at once onto the file list — the generator will try to auto-detect templates based on size and suggest mask/regular files (works best when templates have different dimensions).
RXGE2 resource files
Resource creators often share RXGE2 files containing complete resources (images + metadata). Import or export them via Resources → Import/Export RXGE2 files.
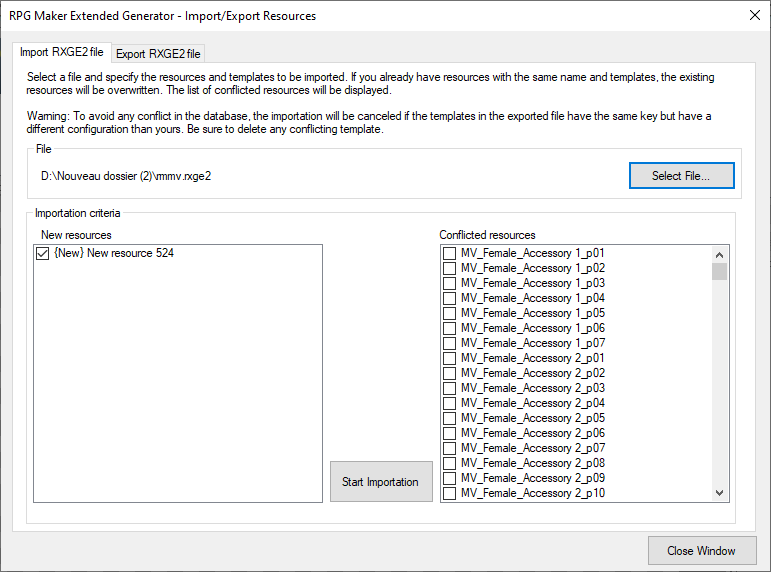
In the Import tab:
- Click Select file… and choose an RXGE2 file
- New resources (not already in your database) appear in one list
- Conflicting resources (same name + template) appear in another
- Check the items you want to import, then confirm
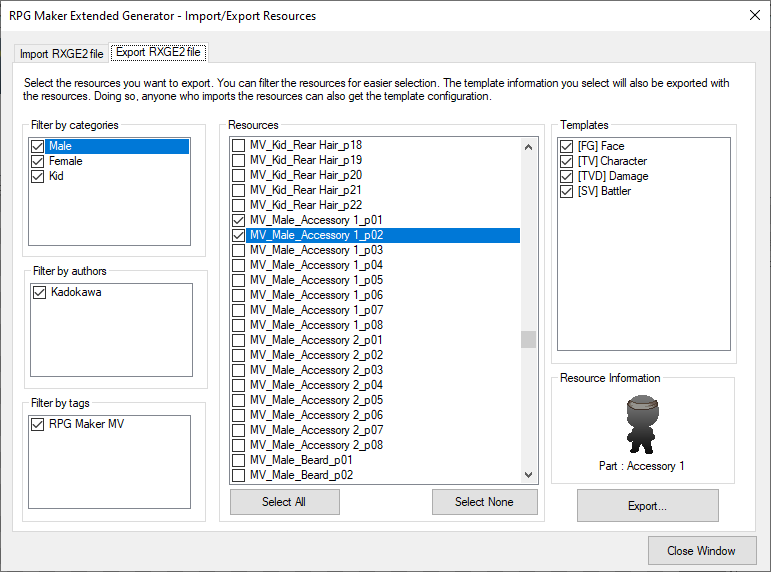
In the Export tab:
- Use the filters on the left to select which resources to include
- Choose which templates to export on the right
- Click Export to create a shareable RXGE2 file
Database export/import (RXGD2 files)
You can export your entire database configuration (categories, templates, gradients, masks, randomization rules, etc. — but not the actual resource images) via Configuration → Import/export database configuration.
The configuration is saved as a single RXGD2 file. When importing a configuration, the generator first deletes your current resources to prevent compatibility problems, then applies the new settings.